
F
Fish
Guest
I'm trying to make a automatic water system for my garden. I'm new in this stuff, i've just bought some books on it, anyone got any tips.
I have made heaps of stuff with Arduino's, happy to help. It is really easy to work with, easy to code, and easy to interface.I'm trying to make a automatic water system for my garden. I'm new in this stuff, i've just bought some books on it, anyone got any tips.


I have made heaps of stuff with Arduino's, happy to help. It is really easy to work with, easy to code, and easy to interface.
What did you have in mind specifically fish?
Since i don't know much about it so i'll start small with 2 outputs for the 2 sprinklers from 1 tapIf you give me some details I can help get you started. How many water outputs/sprinklers/taps? do you want to over ride them, and so on.
Ok so get your Arduino, I recommend the UNO or a clone. They are cheap and will do what you want.Thanks for the info Dundee
 www.arduino.cc
Ok so get your Arduino, I recommend the UNO or a clone. They are cheap and will do what you want.
Go to here and download the software, and follow the instructions on getting it going.

Getting Started with Arduino products
Open-source electronic prototyping platform enabling users to create interactive electronic objects.
You might have to install a USB driver to get the software to see the board.
Plug it in and let it detect, It will power up from USB for now.
Look in your com ports on the control panel and identify which com port it is installed as, it will be obvious :) (This may change with plugging in and out?)
Go back to the IDE and set the com port to match.
Go into the options and select the board model you have eg: UNO.
Go to File -> Examples -> Basic -> and open the Blink sketch
It will open another IDE
Here is the code example. Note it does not define the pin number in the code for the Built in LED, It may be set as a constant in the IDE???
If it does not work, add this line up the top somewhere...
int LED_BUILTIN = 13
Upload and run and watch the led blink on and off on the board.
Try changing the delays to alter the plash interval.
1000 = 1000 milliseconds, or one second
Once you get this far you are 80% there.
I will design a really simple two way relay cct for you in the meantime.
/*
Blink
Turns an LED on for one second, then off for one second, repeatedly.
Most Arduinos have an on-board LED you can control. On the UNO, MEGA and ZERO
it is attached to digital pin 13, on MKR1000 on pin 6. LED_BUILTIN is set to
the correct LED pin independent of which board is used.
If you want to know what pin the on-board LED is connected to on your Arduino
model, check the Technical Specs of your board at:
https://www.arduino.cc/en/Main/Products
modified 8 May 2014
by Scott Fitzgerald
modified 2 Sep 2016
by Arturo Guadalupi
modified 8 Sep 2016
by Colby Newman
This example code is in the public domain.
http://www.arduino.cc/en/Tutorial/Blink
*/
// the setup function runs once when you press reset or power the board
void setup() {
// initialize digital pin LED_BUILTIN as an output.
pinMode(LED_BUILTIN, OUTPUT);
}
// the loop function runs over and over again forever
void loop() {
digitalWrite(LED_BUILTIN, HIGH); // turn the LED on (HIGH is the voltage level)
delay(1000); // wait for a second
digitalWrite(LED_BUILTIN, LOW); // turn the LED off by making the voltage LOW
delay(1000); // wait for a second
}


 www.adafruit.com

Heya Fish, as promised, sorry for the less than stellar presentation. I am no document writer
First some recommended bits to buy.
Something to turn on and off your taps.
Something like this will do it, operates off 12v dc and will handle about 0.8mpa which is about 120 psi, should be heaps.
This example is $7 each
Plastic Water Solenoid Valve - 12V - 1/2" Nominal
Control the flow of fluid using the flow of electrons! This liquid valve would make a great addition to your robotic gardening project. There are two 1/2" (Nominal non-taped National ...
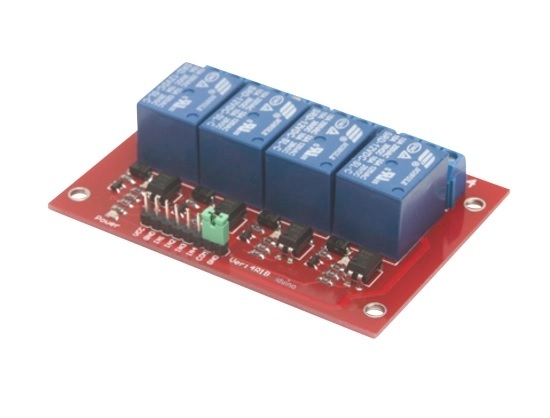
You need a few relays (One per solenoid) so here is a cheap and easy to use relay board that works fine on an Arduino
It is about $10
Arduino 4 Channel 12V Relay
Arduino 4 Channel 12V Relay. Cheap Arduino Relay on sale online. Sydney Australia stock and Warranty with Fast Free Shipping from our Sydney Warehouse. Buy Now and Pay Later with ZipMoney. Now on Sale, Check our range online.www.auselectronicsdirect.com.au
Here is a wiring diagram of sorts :) lol
If it makes no sense ask me a question.
I have done it first using 4 switches. If you make it that far I will modify it to include a real time clock and stuff.
Still easy but a little more involved as unless you want to hard code the on off times into the Arduino were going to need a keypad and a small LCD display.
Don't want to scare you off just yet :)
Finally the code, it compiles without error so it should work.
If you copy paste it into the Arduino IDE it is a lot easier to follow.
Keep me posted and good luck.
// Handy Dandy watering system by Miss Fish :)
// define the relay pins to be used
const int relay1 = 6;
const int relay2 = 7;
const int relay3 = 8;
const int relay4 = 9;
// define the switch pins to be used
const int switch1Pin = 2;
const int switch2Pin = 3;
const int switch3Pin = 4;
const int switch4Pin = 5;
// define the checkstate variables
int switch1State = 0;
int switch2State = 0;
int switch3State = 0;
int switch4State = 0;
void setup()
{
// tell the switch pins to be inputs for this project
pinMode(switch1Pin, INPUT);
pinMode(switch2Pin, INPUT);
pinMode(switch3Pin, INPUT);
pinMode(switch4Pin, INPUT);
// tell the relay pins to be outputs for this project
pinMode(relay1, OUTPUT);
pinMode(relay2, OUTPUT);
pinMode(relay3, OUTPUT);
pinMode(relay4, OUTPUT);
}
void loop()
{
// Main loop, each loop watch to see if a switch has been turned on
switch1State = digitalRead(switch1Pin);
switch2State = digitalRead(switch2Pin);
switch3State = digitalRead(switch3Pin);
switch4State = digitalRead(switch4Pin);
// if switch one has turned on (HIGH)
if (switch1State == HIGH)
{
// tell relay pin one to turn on relay 1
digitalWrite(relay1, HIGH);
}
else
{
// tell relay pin one to turn off relay 1
digitalWrite(relay1, LOW);
}
// if switch two has turned on (HIGH)
if (switch2State == HIGH)
{
// tell relay pin two to turn on relay 2
digitalWrite(relay2, HIGH);
}
else
{
// tell relay pin two to turn off relay 2
digitalWrite(relay2, LOW);
}
// if switch three has turned on (HIGH)
if (switch3State == HIGH)
{
// tell relay pin three to turn on relay 3
digitalWrite(relay3, HIGH);
}
else
{
// tell relay pin three to turn off relay 3
digitalWrite(relay3, LOW);
}
// if switch four has turned on (HIGH)
if (switch4State == HIGH)
{
// tell relay pin four to turn on relay 4
digitalWrite(relay4, HIGH);
}
else
{
// tell relay pin four to turn off relay 4
digitalWrite(relay4, LOW);
}
}
The fun part about it, once you get a prototype up and running, their is so much cool stuff you can add. Moisture sensors that detect dry soil and override the timer LCD displays, temerature sensors that over ride it if it is a hot day, remote access, turn on your sprinklers over the internet. The good part about Arduino is that you can pretty much test every thing you buy, easily, with example code. And usually pretty simple code too. Then once you understand the new device, you just add it to the current project.Thank you very much Dundee.
That Plastic Water Solenoid Valve is amazing. I didn't see anyone using electrons to control the water flow before.
